"There are two food groups in the world: The one you put cheese on and the one you put chocolate on." ~ Anonymous

A Love of Cheese
I love cheese. Anyone who knows me at all knows this. At one point this last semester a glance into my fridge revealed Cheddar, Babybel (which is Edam cheese), Feta, Swiss, Provolone, Brie, Mozzarella, Colby Jack, shredded Parmesan, grated Parmesan and a hunk of fresh Parmesan. I believe this adequately illustrates my obsession with cheese.
I think we'll all be happier if we just pretend that cheese is a non-fattening food that counts as one of our daily vegetable servings.
It should come as no surprise that the concept of making cheese at home sounds fantastic to me! One of my Christmas gifts this year was a mozzarella and ricotta cheesemaking kit. My parents know me so well.
Selecting Milk
As I began to prepare for my cheesemaking adventure I discovered first and foremost that not all milks are created equal. Well, I suppose they're all created equal, but wide discrepancies in pasteurizing temperatures mean that by the time the milk hits the shelf they are no longer equal.
 Ultra-pasteurized milk does not produce cheese. The good news is, most milk is not UP and this must be clearly marked on the label. The bad news?
Many milks are pasteurized at temps just shy of ultra-paseteurization, and this information is not included on the label. Most cheese-makers recommend using raw milk, or pasteurizing raw milk at home.
I know that there are a lot of arguments for the benefits and safety of raw milk, but it makes me nervous. Frankly, I think if you aren't 100% confident as to the cleanliness of the milk, raw milk is too big of a risk. Therefore, I chose to experiment with pasteurized milk from the grocery store. Gandy's dairy is located in Lubbock, so the milk is relatively local. I hoped this might mean a lower pasteurization temperature, as one of the reasons for UP is to help milk keep longer as it is transported long distances.
Making my Curds and Whey
Cheesemaking is not particularly difficult. The only ingredients are milk, water, citric acid, rennet and salt. These are combined and the mixture is heated to various temperatures as ingredients are added. The goal is to end up with silky, custard-like curds.
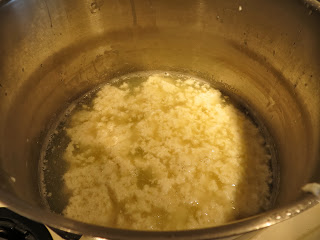
These are not those. These are ricotta-like curds and they signal that my milk was pasteurized at a high temperature.
Rats.
At this point, I suspected failure. My curds were all wrong and did not promise to yield a beautiful ball of mozzarella. I also began to suspect that my food photography needs work, as that is one ugly photo of curds and whey. But to my knowledge, that doesn't affect the cheesemaking process.

I Made Cheese!
With nothing else to do, I decided to continue following the instructions through to the end.
After the curds are removed from the whey, they are heated and stretched, until the curds meld together.
Surprisingly, as I stretched, I got the texture that I had been looking for. I've got cheese! I formed a ball, a log and couple of cheese sticks and threw them into cold water.
A taste test revealed a product that tastes like mozzarella. Fresh, delicious, homemade mozzarella. Perhaps you can tell, I'm fairly proud of this accomplishment.
Making my own cheese makes me so happy that I've already made a second batch. This time I did even more research on milks and discovered that several people have had success with Borden milk, so I used this. Here are my curds at the exact same point in the process as the above curd photo. The curds are solid and custardy. Looks like Borden milk is pasteurized at a lower temperature than Gandy's. I've found a winner! And I'm enjoying fresh mozzarella with freshly baked bread made using the whey from making cheese.
Now, if only I could stay home tomorrow and make cheese and bake bread. I suppose I'll go to work and class instead.


